Dear Tatters,
My
Dot Picots have generated some interest in the last few weeks. This effect,
along with practice pattern, will be shared with the Online Tatting Class soon.
I take this opportunity to explain a bit of the background.
This new idea of
making a single ds ring on chain came to my mind while working with two
shuttles. To my wonder, a beautiful tiny dot was created and I just loved it. Instead of regular picots on a chain, I made tiny
rings that sit above the chain. They are 1-stitch thrown (or thrown-off or
floating) rings and since they are used in place of picots,
I called them Dot Picots. Video Link on How to make Dot Picots updated on 27.05.17
What a fortunate coincidence !
Dot is
actually a vintage term used for tiny rings of up to 4 or 5 stitches only. http://www.bellaonline.com/articles/art3217.asp
Dots are also described by Muskaan in her blog
So dot picot is basically a
1-stitch dot!
I practiced the
Dot Picot by tatting self-designed motifs.
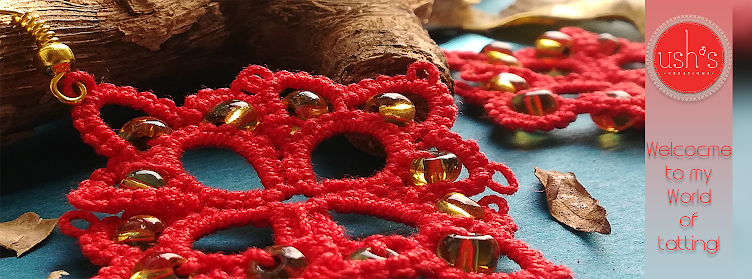
Few of them shown below. First two patterns already shared in the blog.
I will be sharing other patterns too.

I also found that I could change regular picot
motif into a dot picot motif too.
To name few, I
tatted Rosemary Peel’s Heart

and Nina Libin’s Heart for Kay http://shuttlecreations.blogspot.in/2017/04/heart-transforms.html

for transforming into Dot Picots.
Dot Picots are not possible on regular rings. They require a second shuttle and
can be done only on chains and mock rings.
Tatting designer, teacher Nina Libin says,
"I think Dot picots are really good for edgings, while decorative long
picots may get squashed or distorted with use, Dot picots will hold the solid
outline"
My IndianTatting group friend Shalmali Bapat says, “I liked dot picots not only for its delicate look but the uniformity it gives. Else maintaining same size of simple picots is bit tedious.”
My IndianTatting group friend Shalmali Bapat says, “I liked dot picots not only for its delicate look but the uniformity it gives. Else maintaining same size of simple picots is bit tedious.”
As long as one is using 2
shuttles, decorative picots in any pattern can be converted to dot picots for
an alternative effect. It will give your tatted work an ornamental look and
they look like tiny beads.
Lets try to tat a
dainty Dot Picot step by step
ʘ symbol denotes 1 dot picot

Take two shuttles SH1 Blue, SH2 white (See
Pic 4)
Start *R 5ds, Long picot for center, 5ds cl.
RW.
Start
Ch 6ds, drop SH1, With SH2 make ʘ
(dot picot is a ring with 1ds, cl),
pick SH1, ch 6ds. RW
Continue from *
three more times, joining all rings in center picot.
Tie n cut threads.
Before I shared
Dot Picots online, I didn’t know much about the symbols and terminology in tatting.
Experienced tatters Muskaan, Georgia Seitz and Nina Libin helped me a lot in
choosing perfect symbol for the Dot Picot. They also guided me about already
existing terms on similar technique like Dots, Knotted Ring Picots etc.
Karen Cabrera has tatted
the same picots differently leaving bare thread on both sides of the double
stitch, such that the tiny 1ds ring floats at a distance.
She called it Knotted
Ring Picot in her Tatting Lesson 141.
And here is a comparison of knotted ring picots and
dot picots used in the same motif I shared above.

You can make out
the difference between two types of picots in above pic. Karen has left some
bare thread before and after making a double stitch. The ring is at the tip of
a picot.
The Dot picot
exactly sits on the chain without any gap, an easy alternative to beads.
So start working on Dot Picots now!!!
I welcome your comments,
queries, suggestions.
Wow simply loved the way you explained Usha! With pics too...god bless u and may u have a wonderful future creating techniques ...
ReplyDeleteThank you so much Thilothama!!!
DeleteLovely motifs, and the dot picots are very nice. They look kind of like small beads. I will have to try it out and maybe stop by the Online Tatting Class for the lesson :)
ReplyDeleteYes Robin, they look like tiny beads of same thread. It's simple variation but looks great. Wish you try them out. Thanks. See u in class.
DeleteYour designs look so unique with your dot picots!! :) I love the enhancement they give!! :)
ReplyDeleteYes God's Kid!!!! They really enhance overall look of tatting. Thanks a lot.
DeleteVery creative and explained nicely! Love the dot picots!
ReplyDeleteThank you Maria!!!
DeleteGreat going Usha,looking forward to more creativity from you.all the best
ReplyDeleteThanks a Lot Colours!
DeleteWonderful great idea!
ReplyDeleteThank you Carollyn!!
DeleteI can't wait to try these! Love the simple beauty! Hope to be in online class- thank you so much for the lovely class pattern, Usha!
ReplyDeleteThanks Mary. Sure, meet you in class soon.
ReplyDelete